
Adobe Photoshop CS6 is a multimedia amp design software related on Adobe Photoshop adobe Photoshop cs6.Follow the Complete video and you will have full version with serial and fully activated version of Photoshop CS6 Extended.Download links are below. Adobe Photoshop CS6 The next generation of Photoshop comes packed with essential new features.Adobe Photoshop CS6 Extended v13.0 Portable by ThumperDC.
{source}

Portable Photoshop CS5 includes innovative resources to improve the creative
potential of customers. Brand new illustrating resources include a
device Mixing machine Sweep, who blends thousands of shades on one brush
device Bristle Tips, creating the effect of this apply brush. With
Puppet Twist device, customers can change the position or view of any
element of the picture, for example, sorted his curved arm on the images
or modify an picture of the scenery to make a new spatial viewpoint.
{source}

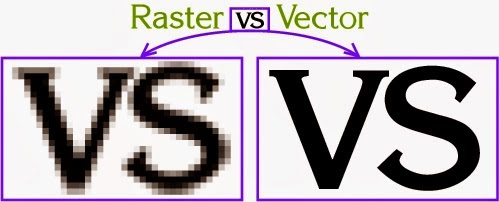
Raster images are made of pixels. A pixel is a single point or the smallest single component in a display device. Let's think of them as little tiny squares* or dots of color or shade.
- Common raster image files: jpg, jpeg, gif, png, tif, tiff, bmp, psd and pdfs originating from raster files
- Common raster programs: paint programs like Photoshop & Paint Shop
- Common raster images: photographs, paintings
Vector images are mathematical calculations from one point to another that form geometrical shapes.

I've magnified the raster and vector images above and we can easily see the differences between the two but sometimes you cannot see the difference at a glance on a normal view. Vector graphics also display an outline or wireframe view and this is very important for certain processes, more details below.
When a raster image is scaled up, it usually loses quality. A raster image can be enlarged by either adding more pixels (which Photoshop randomly - but smartly - adds) or enlarging the size of the pixel. Either way you are spreading the original data over a larger area at the risk of losing clarity.
A vector program will use a mathematical formula to build an image that can be scaled to any size without losing quality.
Raster Images
First let me say: Raster images are also called Bitmap images, pixels are also called dots, and dots-per-inch (dpi) sometimes called pixels-per-inch (ppi) although technically they have distinct meaning I may use those terms interchangeably in this website.
Raster images' dimensions are measured in pixels. Because raster images cannot be enlarged without losing quality, different suppliers have specific size requirements for their processes; they require a specific pixel resolution: a specific amount of pixels within each inch. The amount of pixels within each inch in the image represents the image pixel resolution or ppi (pixels per inch).
When we see an image on a 72 dpi monitor, we are seeing 72 pixels within each inch.
How large a raster image can be printed - and maintain quality - depends on 2 things:
the pixel dimension of the image (e.g. 6824 pixels wide by 2345 pixels high)
the pixel resolution: dots-per-inch (dpi) required by the specific printer
Some offset printers (paper printers) require a minimum of 300 dpi
Some screen printers (t-shirts, cloth) require a minimum of 240 dpi
Large format printers (banners, billboards) vary a lot because it also depends on the distance from which the sign is going to be viewed - could be as low as 20 or more than 200
How to determine what size your raster image must be, for good quality printing:
Multiply the resolution required by the area to be printed. Examples:
If a printer requires a minimum of 300 dpi and you want to print an image in an area that is 5 inches wide, multiply 300 pixels x 5 inches (300 x 5 = 1500). Your image must be at least 1500 pixels wide.
If a printer requires a minimum of 240 dpi and you want to print an image in an area that is 12 inches wide, multiply 240 pixels x 12 inches (240 x 12 = 2880). Your image must be at least 2880 pixels wide.
Can we enlarge the pixel dimension and resolution of a raster image?
Raster images have a certain amount of pixels within each inch. A 72 ppi image has 72 pixels in every inch. A 300 dpi image has 300 dots per inch. Usually the higher the dpi, the higher the quality. When you are required to provide a high resolution image file, the file must have been created or scanned at both the dimension and the resolution required. E.G. if you need to print an image at 2 inches wide and 300 dpi is required, your image must be created/scanned at a minimum of 600 pixels (2in x 300dpi).
Once the image is created at a certain dimension, you may not be able to use this image at a larger size without losing quality. The resolution and size can be manually increased but the quality may suffer. When you manually increase the resolution with a program like Photoshop, Photoshop randomly adds pixels and the result will most likely be a high resolution image of poor quality.
Sample of a raster image below:

How to determine what dimension your existing image can be printed at:
- Divide the pixel dimension of your image by the resolution required by your printer.
To view and edit an image pixel dimension you must use a photo-editing program like Adobe Photoshop or Paint Shop Pro to open the raster file.
Examples:
- If your image is 1993 pixels wide & printer requires 300 dpi (1993 ÷ 300) can be printed at 6.643 inches.
- If your image is 1993 pixels wide & printer requires 240 dpi (1993 ÷ 240) can be printed at 8.304 inches.

Tutorials: 15 Steps How to create Photoshop pattern.
Lot of you might be curious on how to define your own cool Photoshop pattern and use it to your own ease. Well don’t be bother because this is very easy and after knowing it you can create thousands of pattern of yours and share it to the community. Now let’s start.
1. Open your Photoshop (I’m using CS5.5 and it works perfectly on CS4 too).
2. Now, open the image you want to create a preset of your pattern. Use the keyboard shortcut “CTRL + O”.
3. Now select Rectangular Marquee tool. Use keyboard shortcut “CTRL + M”.
4. Define the part you will going to use as your pattern. If you want you can select it all
by just using the key shortcut “CTRL + A”.
5. After that, go to Image tab/option.
6. Now find for Define Pattern on the drop down. It must be between Define Brush Preset and Define Custom Shape (depends on PS version).
7. A new small rectangular window will pop out. Now you can name your pattern by just entering your desired one on the Name textbox. Now click Ok button.
8. Now you can close the image and you can now try your pattern.
9. Open up a new workspace. Define what ever name, width and height you want. Use the keyboard shortcut “CTRL + N”.
10. Try to type some words by using the Horizontal Type Tool. Define your own font type. Use the keyboard shortcut “CTRL + T”.
11. Now on the Layer panel, double click your Text layer to open up Layer Style. Or you can right click on it and choose Blending Options.
12. After that, you should be able to see different Styles. Now, browse for the Pattern Overlay, just right between Gradient Overlay and the last style, Stroke (depends on PS version).
13. If the Pattern Overlay is successfully check you can now able to define your own pattern. You can change the default pattern set to your text by just clicking on the inverted triangle on the Pattern box at the middle. You can see different pattern, now you need to choose your pattern you have created.
14. Try playing on it. Better add a Bevel and Emboss and Drop Shadow. Now click on Ok button if it is great for you. Now you can save your cool image to whatever image file type you want.
15. To navigate to your Pattern file, go to this address C:\Program Files\Adobe\Adobe Photoshop CS5.1\Presets\Patterns.

Here's my Fanart for Walter White.. I miss this show so much. I started watching The Walking Dead when it first came out, but began watching Breaking Bad in the beginning of last summer and got hooked. The writing was like no other. The acting and actors were brilliant.now when I watch the Walking Dead, it's like watching a high school play compared to Breaking Bad.
Last week, The Walking Dead Season 4 Episode 6 “Live Bait,” featured the highly-anticipated return of The Governor. The episode attracted 12 million viewers, which was a slight drop from the previous week, but still good enough to be the most-watched cable show of the week.

I love this series! I have NEVER enjoyed and looked forward to any television series as much as I do the Walking Dead Vector.

I'll start form the bottom and work my way up explaining the uses of all the Photoshop tools that I use.
Image Ready - button lets you edit the image in Adobe Image-ready.
Screen Modes - Standard lets you see all the images you're editing in separate windows, the next button maximizes all the windows of the images to the workspace, and the full screen mode maximizes the image to the whole screed over the task-bar.
Foreground and Background Colors - lets you see and change the colors you're editing an image with.
Hand Tool - if you know what it does, tell me.
Zoom Tool - Zoom in a particular part of the image.
Eyedropper - Using Alt you can copy a certain color form an image and draw with that color on the image or a separate image.
Objects Tools - There are Rectangle, Rounded Rectangle, Ellipse, Line, Polygon, and Custom Shape Tools, each of which can be draw on an image.
Text Tools - Let's you put text on an image.
Smudge Tool - Smears the image in the direction you choose.
Blur Tool - Blurs an image in areas you select.
Paint Bucket Tool - Fills a chosen color on to an image with the selected color.
Erase Tool - Erases an image to its background, either white, a selected color, or transparent.
Clone Stamp Tool - Using Alt you can select a part of an image and recopy that part to a different image or to a different area of the same image.
Brush Tool - Draws lines of a selected brush in a direction you choose.
Pencil Tool - Draws lines of a selected brush in a direction you choose, without anti-aliasing.
Crop Tool - Crops the image to the area selected.
Move Tool - Moves the objects or layers in the image, or the image itself.
Wand Tool - Selects a color and its shades so that only that part of an image can be modified or added effects to.
Lasso Tool - Lets you select a part of an image to be modified by itself.
Marquee Tools - Let's you select a defined object of an image or creat a defined object.
Photoshop Tools lets you create your own workspace that fits you the best.
You can move or get rid of any options and settings windows in your workspace so that it can be used to your best interest.

Adobe Photoshop is an image editing, or image creating application, with a lot of advanced and useful tools.
Photoshop Definitions and Terms:
- Image - picture, a visual representation of an object or scene or person or abstraction produced on a surface.
- Pixel - the information stored for a single grid point in the image. The complete image is a rectangular array of pixels. A pixel consists of a single color.
Difference between Canvas Size and Image Size
The image is an object that was drawn and when changing the size of it, it either shrinks or expands, canvas is the space provided to draw the image on, decreasing the size of the canvas doesn't shrink the image but cuts it off, when increasing the canvas size there is more space provided and you can draw out side of the image.
The image is an object that was drawn and when changing the size of it, it either shrinks or expands, canvas is the space provided to draw the image on, decreasing the size of the canvas doesn't shrink the image but cuts it off, when increasing the canvas size there is more space provided and you can draw out side of the image.
- Transparent - if an image is not transparent, the image is automatically a rectangular size, if the image is transparent, for instance a circle will always be a circle, the canvas is transparent so the pixels around the circle are non existent.
- Anti-aliasing - Smoothing or blending the transition of pixels in an image. Anti-aliasing the edges on a graphic image makes the edges appear smooth, not jagged.
- Layer - layers pile on top of each other, think of it as earth's layers of soil, crust and so on. You can change th order of layers, depending if you want an image under an image or the other way around.
- Filter - under Filter you will find numerous effects you can apply to a image or selected region of an image.
- Bitmap - A representation, consisting of rows and columns of dots, of a graphics image in computer memory. The value of each dot (whether it is filled in or not) is stored in one or more bits of data.
- Gray scale - An image representation in which each pixel is represented by a single sample value representing overall luminance (on a scale from black to white).
- RGB Color - The red, green, and blue (RGB) color system can represent a large portion of the color spectrum by mixing these three primary colors.
- Lab Color - a color model developed by the Center Internationale d´Eclair-age (CIE). These standards are internationally accepted standards for all colorimetric measurements. The Lab model, like other CIE color models, defines color values mathematically, in a device independent manner. Lab color is consistent color regardless of the device producing the color.
Technically, it’s the words "vector" and "pixel" combination. That’s why when you say “Can you vector my photo in Photoshop?” That’s just wrong.
The difference between Vector and Vexel graphics is this:
The difference between Vector and Vexel graphics is this:

- Vector graphics is done usually in Adobe Illustrator.
- Vexel graphics is done in Adobe Photoshop.
When you zoom in a vector image, the image is not pixelated. When you zoom in a vexel image, the image is pixilated. But when you zoom out both, they are almost the same.

Here are the VXY abbreviations and meanings.
VXY Groups abbreviations:
- AI [ Adobe Illustrator ]
- A/W [ Artwork ]
- Az [ Abduzeedo ]
- CnC [ Comment & Critism (Critique) ]
- DA [ Deviantart (deviantart.com) ]
- DF [ Daily Feature (Shadowness) ]
- DI [ Daily Inspiration (Shadowness) ]
- DP [ Digital Painting ]
- Desgr [ Designer ]
- EB [ Eyeball ]
- FTW [ For the Win ]
- GEB [ Grand Eyeball ]
- PMS [ Pantone Matching System ]
- SN [ Shadowness (shadowness.com) ]
- Tradi [ Traditional ]
- OT [ Off Topic ]
- PS [ Photoshop ]
- VxV [ Vector X Vexel ]
- WIP [ Work In Progress ]


