Showing posts with label Vector Tricks. Show all posts

Raster images are made of pixels. A pixel is a single point or the smallest single component in a display device. Let's think of them as little tiny squares* or dots of color or shade.
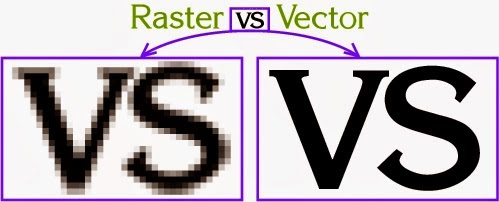
- Common raster image files: jpg, jpeg, gif, png, tif, tiff, bmp, psd and pdfs originating from raster files
- Common raster programs: paint programs like Photoshop & Paint Shop
- Common raster images: photographs, paintings
Vector images are mathematical calculations from one point to another that form geometrical shapes.

I've magnified the raster and vector images above and we can easily see the differences between the two but sometimes you cannot see the difference at a glance on a normal view. Vector graphics also display an outline or wireframe view and this is very important for certain processes, more details below.
When a raster image is scaled up, it usually loses quality. A raster image can be enlarged by either adding more pixels (which Photoshop randomly - but smartly - adds) or enlarging the size of the pixel. Either way you are spreading the original data over a larger area at the risk of losing clarity.
A vector program will use a mathematical formula to build an image that can be scaled to any size without losing quality.
Raster Images
First let me say: Raster images are also called Bitmap images, pixels are also called dots, and dots-per-inch (dpi) sometimes called pixels-per-inch (ppi) although technically they have distinct meaning I may use those terms interchangeably in this website.
Raster images' dimensions are measured in pixels. Because raster images cannot be enlarged without losing quality, different suppliers have specific size requirements for their processes; they require a specific pixel resolution: a specific amount of pixels within each inch. The amount of pixels within each inch in the image represents the image pixel resolution or ppi (pixels per inch).
When we see an image on a 72 dpi monitor, we are seeing 72 pixels within each inch.
How large a raster image can be printed - and maintain quality - depends on 2 things:
the pixel dimension of the image (e.g. 6824 pixels wide by 2345 pixels high)
the pixel resolution: dots-per-inch (dpi) required by the specific printer
Some offset printers (paper printers) require a minimum of 300 dpi
Some screen printers (t-shirts, cloth) require a minimum of 240 dpi
Large format printers (banners, billboards) vary a lot because it also depends on the distance from which the sign is going to be viewed - could be as low as 20 or more than 200
How to determine what size your raster image must be, for good quality printing:
Multiply the resolution required by the area to be printed. Examples:
If a printer requires a minimum of 300 dpi and you want to print an image in an area that is 5 inches wide, multiply 300 pixels x 5 inches (300 x 5 = 1500). Your image must be at least 1500 pixels wide.
If a printer requires a minimum of 240 dpi and you want to print an image in an area that is 12 inches wide, multiply 240 pixels x 12 inches (240 x 12 = 2880). Your image must be at least 2880 pixels wide.
Can we enlarge the pixel dimension and resolution of a raster image?
Raster images have a certain amount of pixels within each inch. A 72 ppi image has 72 pixels in every inch. A 300 dpi image has 300 dots per inch. Usually the higher the dpi, the higher the quality. When you are required to provide a high resolution image file, the file must have been created or scanned at both the dimension and the resolution required. E.G. if you need to print an image at 2 inches wide and 300 dpi is required, your image must be created/scanned at a minimum of 600 pixels (2in x 300dpi).
Once the image is created at a certain dimension, you may not be able to use this image at a larger size without losing quality. The resolution and size can be manually increased but the quality may suffer. When you manually increase the resolution with a program like Photoshop, Photoshop randomly adds pixels and the result will most likely be a high resolution image of poor quality.
Sample of a raster image below:
When a raster image is scaled up, it usually loses quality. A raster image can be enlarged by either adding more pixels (which Photoshop randomly - but smartly - adds) or enlarging the size of the pixel. Either way you are spreading the original data over a larger area at the risk of losing clarity.
A vector program will use a mathematical formula to build an image that can be scaled to any size without losing quality.
Raster Images
First let me say: Raster images are also called Bitmap images, pixels are also called dots, and dots-per-inch (dpi) sometimes called pixels-per-inch (ppi) although technically they have distinct meaning I may use those terms interchangeably in this website.
Raster images' dimensions are measured in pixels. Because raster images cannot be enlarged without losing quality, different suppliers have specific size requirements for their processes; they require a specific pixel resolution: a specific amount of pixels within each inch. The amount of pixels within each inch in the image represents the image pixel resolution or ppi (pixels per inch).
When we see an image on a 72 dpi monitor, we are seeing 72 pixels within each inch.
How large a raster image can be printed - and maintain quality - depends on 2 things:
the pixel dimension of the image (e.g. 6824 pixels wide by 2345 pixels high)
the pixel resolution: dots-per-inch (dpi) required by the specific printer
Some offset printers (paper printers) require a minimum of 300 dpi
Some screen printers (t-shirts, cloth) require a minimum of 240 dpi
Large format printers (banners, billboards) vary a lot because it also depends on the distance from which the sign is going to be viewed - could be as low as 20 or more than 200
How to determine what size your raster image must be, for good quality printing:
Multiply the resolution required by the area to be printed. Examples:
If a printer requires a minimum of 300 dpi and you want to print an image in an area that is 5 inches wide, multiply 300 pixels x 5 inches (300 x 5 = 1500). Your image must be at least 1500 pixels wide.
If a printer requires a minimum of 240 dpi and you want to print an image in an area that is 12 inches wide, multiply 240 pixels x 12 inches (240 x 12 = 2880). Your image must be at least 2880 pixels wide.
Can we enlarge the pixel dimension and resolution of a raster image?
Raster images have a certain amount of pixels within each inch. A 72 ppi image has 72 pixels in every inch. A 300 dpi image has 300 dots per inch. Usually the higher the dpi, the higher the quality. When you are required to provide a high resolution image file, the file must have been created or scanned at both the dimension and the resolution required. E.G. if you need to print an image at 2 inches wide and 300 dpi is required, your image must be created/scanned at a minimum of 600 pixels (2in x 300dpi).
Once the image is created at a certain dimension, you may not be able to use this image at a larger size without losing quality. The resolution and size can be manually increased but the quality may suffer. When you manually increase the resolution with a program like Photoshop, Photoshop randomly adds pixels and the result will most likely be a high resolution image of poor quality.
Sample of a raster image below:

How to determine what dimension your existing image can be printed at:
- Divide the pixel dimension of your image by the resolution required by your printer.
To view and edit an image pixel dimension you must use a photo-editing program like Adobe Photoshop or Paint Shop Pro to open the raster file.
Examples:
- If your image is 1993 pixels wide & printer requires 300 dpi (1993 ÷ 300) can be printed at 6.643 inches.
- If your image is 1993 pixels wide & printer requires 240 dpi (1993 ÷ 240) can be printed at 8.304 inches.
The image quality in vector-based graphics does not depend on the DPI of the output device. This type of artwork in graphic design is good for logo designs because the resulting image is clear and crisp. Vector-based graphics do not work well when there is a need for soft-toned graphics in a picture. A picture which requires a lot of tonal changes is difficult to achieve in vector art. If you are interested in adding a vector-based image on your web page then you need to rasterize the image (convert it into a bitmap image). But the vector images that are created in Flash can be used in a web page without converting it. Besides Flash, there are several plug-ins that are available which support vector-based images. In many cases, the browsing software faces trouble in dealing with a vector-based graphics and rasterizes the vector image itself.

Vector-based images cannot be for realistic pictures. This is very important to know that the conversion of pixel-based image into a vector-based image is very difficult. It can only be done by using specific software. It is wise to use bitmap images in graphics or for web design because images produced by scanners and digital devices are bitmap images and the conversion of pixel-based image into a vector image is a difficult task.

This Vector Human Eye Shading Video Tutorial gives you a full tips and tricks on how to do a vector eye shading.on your own Photoshop computer.
Video tutorial: {source}
Things you need:
The pen tool
In order to create vector art, you must first master the pen tool. This comprehensive guide aims to introduce you to features, shortcuts, and methods for working with what is arguably Adobe's most essential tool.
In order to create vector art, you must first master the pen tool. This comprehensive guide aims to introduce you to features, shortcuts, and methods for working with what is arguably Adobe's most essential tool.
Drawing vector graphics
This video tutorial is a really useful resource for explaining exactly how to create vector art in Illustrator.
Creating simple, organic shapes
Learn how to create simple, organic vector shapes in Illustrator with this easy-to-follow tutorial from graphic and web designer Veerle Pieters.
Add texture to your vector illustrations
Adding texture to your vector art is a great way to give it more dimension and perspective. In this easy to follow video, Illustrator expert Alexandra Cecilio explains how to get the most out of textures.
Adding texture to your vector art is a great way to give it more dimension and perspective. In this easy to follow video, Illustrator expert Alexandra Cecilio explains how to get the most out of textures.
It's hard to tell the difference between a created vexel and a vector. This is because they are not a style of art, but a medium of art.

When we say a "medium" we mean with how a piece of art is created or what with. For instance we have both traditional and digital paintings. A traditional painting is created with, for example, oils and water colours. however a digital painting is created with, for example, you use a paint brush tool or smudge/dodge/burn tool. Although the end result is the same, it's what it's been made with which is the key difference... and especially how we categorize it on deviantART.
Vexel art: created using raster layers.
Vector art: created using vector layers.
It's easy to remember vectors are made with vector layers... but to associate vexels with raster layers is a little less easy.
The word "vexel" was created based on work appearing to be vector art, but was on raster layers which consist of pixels.
Ok, this is a little exercise you can do to show you the difference.
1) Right click on your own avatar and save it to your desktop.
2) Open it in your graphics program of choice.
3) Zoom into the image as much as you can... well maybe until about 500%
Below is the example avatar zoomed in at 500%:

Looking at your avatar you can see how it is made up of coloured squares. These squares are pixels and show that your .jpg/.gif or .png file of this image is on a raster layer.
1) Now zoom back to 100%
2) Go to Edit > Resize or Image > Resize --- or which ever way to resize the image size.
3) Increase the size to say 500% of the original size
Below is the example avatar resized in at 500%:

Depending on the program you have used, you will either see the coloured squares... or you may see a big version of your avatar but with blurred lines and not as sharp as your original sized avatar.
In the first image, your art program read the file and the file told it that for each single pixel in your avatar, it wants it to be a specific colour and in a certain place.
When you resize it, your art program tries to do the best it look as smooth as possible when the size is increased... and to not make the image look pixelated.


